How to send email newsletters using AbcSubmit

Creating an email newsletter campaign for your customers and contacts was never easier! With AbcSubmit Form Builder and Website Builder you have the power to create email templates inside your favorite email client, send it to your AbcSubmit account and then just build your brand new email campaign. AbcSubmit’s offers database collections to store your own customer data and then you have the ability to create delivery queues based on your collection entries.

Follow this “How to” article, in order to learn how to create and send email newsletters using the AbcSubmit platform. 

Go to the AbcSubmit dashboard section and click the Newsletters option in the left sidebar.                              

After you’ve inside the Newsletters section, in the Home screen, you can see your campaigns, delivery queues, email templates, and your identities.

How to create email templates

In order to create an email template on AbcSubmit, you have to create an email on your desired email client (Thunderbird, Outlook, etc) and then just send it from your email to newsletters@abcsubmit.com in order to use it inside your AbcSubmit newsletters.


 For this article, I’ve used Gmail in order to create my desired newsletter template. After creating the email template just send it tonewsletters@abcsubmit.com.

After you send your email template, the email template should appear in Email Templates inside the Newsletters section.

You can choose to preview or delete your email template.

How to create a delivery queue

After you have the email template for your newsletter, you need to create a delivery queue. In order to create the delivery queue, you have to click on Delivery Queue in the left sidebar and then click the New Delivery Queue button placed on the top of the section.

Note: The delivery queue is the place where you manage to who your emails will be sent and in which conditions.

Now you can create your delivery queue for your campaign:

  • Delivery queue name – Set a name for your delivery queue.
  • Associated BigData collection – in order send email newsletters you need to have a collection.

Note: If you don’t have a collection, click here to learn how to create one. 
You may want to save your form data in a collection. Click here to learn how to save your form data inside a collection.

  • Email column – Select the collection column containing the emails.
  • Tags column – Select the collection column containing the tags.
  • Deliver to contacts which have tags – Select for which existent tags you want to send the newsletter(Ctrl + click on a tag in order to select multiple tags).

Click the Ok button in order to save your delivery queue.

The email campaign will be sent to each email which has the tags you have selected.

After creating your delivery queue, you will see your newly created queue under Delivery queues sub-section. 

You can delete your delivery queue by clicking the delete button shown in the image below.


How to create a new identity

In Newsletters -> Home click on the Manage your Identities to add a new identity or delete an identity.

Note: In order to send Newsletters, you must have at least one Identity verified and authorized.

A new popup will be opened where you can click the Add identity in order to add a new email.

Now you can add your own email, click the Create identity button to save your identity and follow the 2 step identity verification process.

After adding your identity, click on the verification steps in order to verify your email address and to create the CNAME and TXT records required for the second verification step.

1. Insert the code received on the email address inserted on the creation identity step. 

Then click the Confirm button in order to continue.

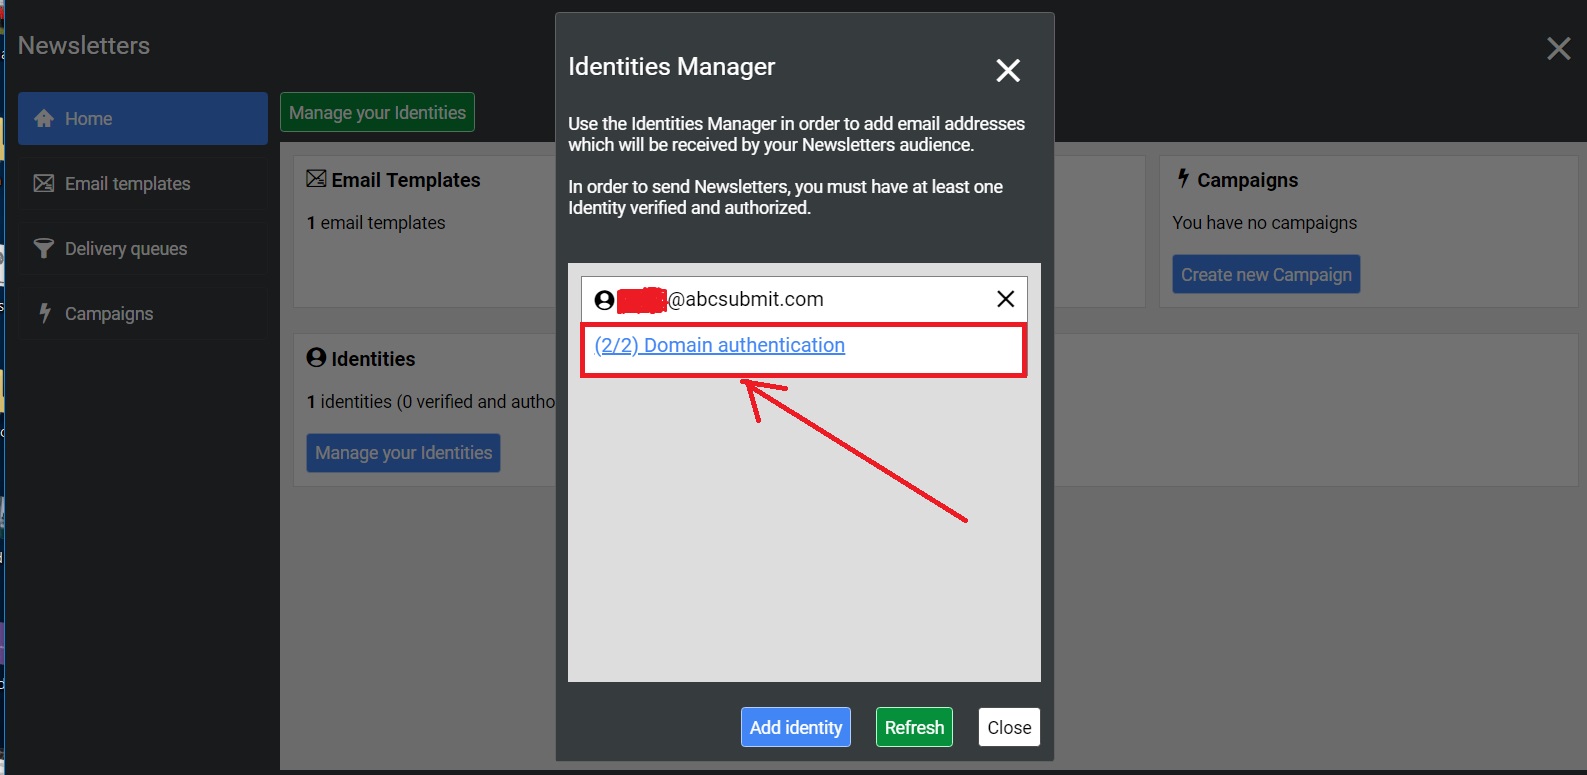
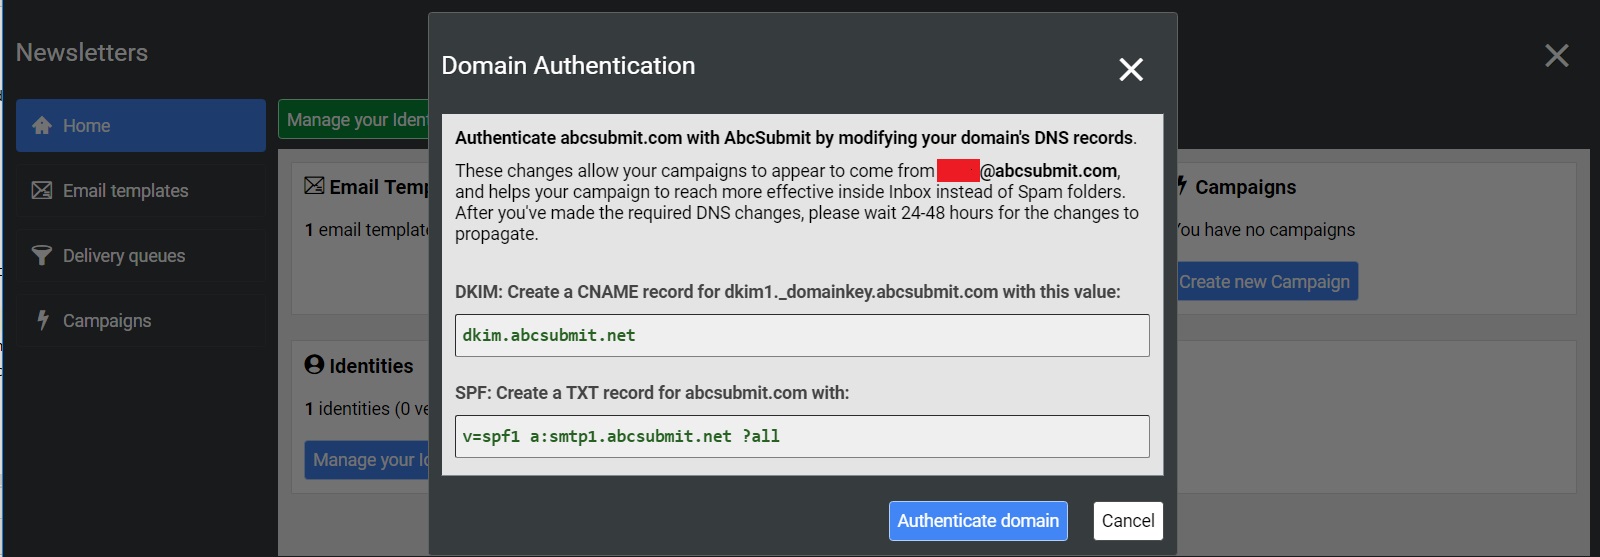
2. Modify your domain’s DNS records.

Create a CNAME record for dkim1._domainkey.abcsubmit.com with this value: dkim.abcsubmit.net.

Create a TXT record for abcsubmit.com with: v=spf1 a:smtp1.abcsubmit.net ?all

Note: After you’ve made the required DNS changes, please wait 24-48 hours for the changes to propagate.

Click the Authenticate domain button when you added the records and we will verify if you’re ready to send newsletters.

After the two steps are finished your email should appear as verified and authorized.

How to create your email campaign

To create your email campaign click on Campaigns sub-section in the left sidebar and then click the New Campaign button.

Now you can create your email campaign:

  • Create a new Campaign named – add a name for your campaign.
  • Using Email Template – choose your email template.
  • Using Email Identity – choose a verified identity.
  • Using Delivery Priority – choose a priority (this will help when you have multiple email campaigns running simultaneously).
  • For all contacts from a Delivery Queue – choose a delivery queue you’ve created.

Click the Create Campaign button in order to save your campaign.

After your campaign is saved, you will see the created campaign and status under Campaigns sub-section. When you’re ready to start your campaign just click the Play button at the bottom of your campaign.

Delete a campaign by just clicking the Delete button at the bottom of your campaign.

Preview your campaign email by just clicking the Mail button at the bottom of your campaign. An email will be sent to the identity you set on your email campaign.

After you start the campaign you can Pause, Abort campaign or view campaign Analytics.

You’re ready to start your email marketing!

Spread the love